The ADAT format is more often the choice of personal studios than professional facilities — but the M20 is set to change all that. Hugh Robjohns takes the new flagship ADAT for a spin.
The Alesis M20 is aimed squarely at professional recording studios and post‑production houses, offering full compatibility with all earlier ADAT recorders, 20‑bit audio quality, a complete feature set of essential professional facilities, and a familiar, easy‑to‑use operational interface.
The main attractions of the M20 start with its ability to play both Type‑I 16‑bit ADAT tapes and 20‑bit Type‑II ADAT tapes. The internal converters boast 24‑bit resolution, and the analogue I/Os operate with balanced +4dBu levels. On the digital I/O front, an optional card (which was, unfortunately, not available for this review) provides eight channels of AES/EBU interface in addition to the standard ADAT optical link. 20‑bit recordings can, if necessary, be dithered down to 16‑bit resolution on output.
A major advance is the jog/shuttle wheel which, in conjunction with a dedicated analogue Aux track, allows audio spooling and scrubbing that makes accurate searching easier. There is also a comprehensive set of digital synchronisation facilities, and the tape transport has been built to survive extended use. An integral timecode generator and dedicated timecode track also boost the professional credibility of the machine — though anyone feeling its sheer weight and solidity would, in any case, have no doubt about this.
One potential drawback of the M20, for some users, is that the M20 requires a new remote controller — the CADI (Controller Autolocator Desktop Interface), instead of the familiar BRC. Unfortunately a CADI was not available for this review, and I only have pictures to base my impressions on, but it appears to be well laid‑out in terms of its ergonomics. It supports up to eight machines, with remote jog/shuttling facilities, and a full sized display panel to mimic that on the front of the M20. It appears to possess the same air of professionalism as the machine itself, and would not disgrace even the most prestigious console.
Professional Qualifications
'Professional' is a word which will appear often in this review — the styling of the M20's front panel alone just oozes professionalism, with the large meter and alphanumeric displays surrounded by a wealth of neat illuminated buttons. With over 80 buttons on the front panel, you might think the M20 would be a daunting beast to operate, but actually the reverse is true. Thanks to the large number of dedicated buttons there are no nested menus, and the ergonomic layout means that functions are grouped sensibly, and buttons appear where you expect to find them. Any function is literally only a button press away rather than three buttons, 12 menu sub‑levels, and 15 revolutions of the data entry wheel.
Though I am not an experienced ADAT user, being far more familiar with Tascam digital multitracks, it's a testament to the M20's ease of use that I had no problems at all in finding my way around the front panel, and was confident enough to use it in earnest after only five minutes of playing — and most of that was figuring out how to use the auto‑punch modes and setting the internal timecode generator!
...being far more familiar with Tascam digital multitracks, it's a testament to the M20's ease of use that I had no problems at all in finding my way around the front panel, and was confident enough to use it in earnest after only five minutes of playing...
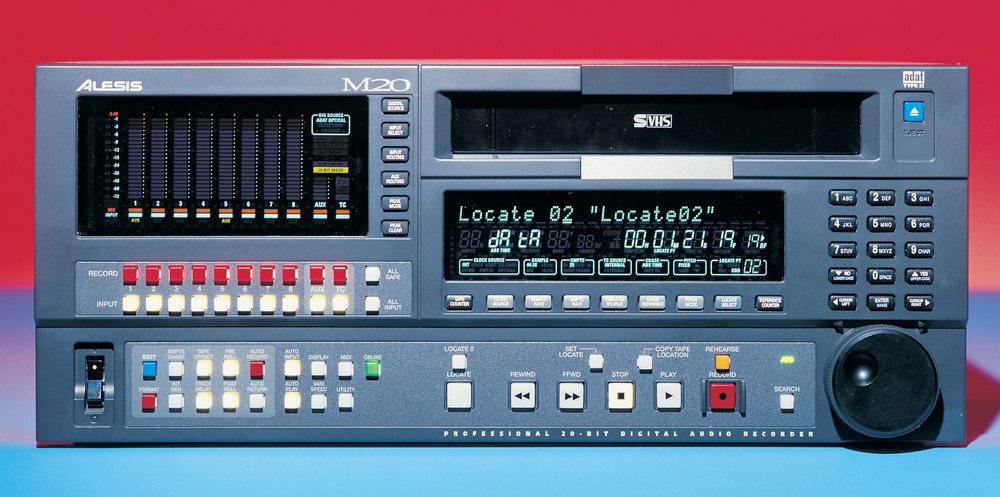
So, time to take a tour of the M20's controls. The front panel presents you with five main sets of buttons: the first grouped around the meter display; another below the central alphanumeric display; 17 configuration buttons are gathered in the bottom left corner; the main transport controls are in the centre; and finally there's a set of alphanumeric keys for data entry at the top right.
The transport controls adopt the standard layout, with Record and Play keys adjacent — it's a small thing, but Sony caused a lot of confusion on their version of the DA88, the PCM800, by locating Stop in between Play and Record. Above the Record key is a Rehearse button, for practice runs at automated punch‑in/out, and to the left of the Rewind key is a pair of locate buttons. The smaller is a dedicated Locate‑Zero button (always the absolute zero time on the tape), and the larger Locate button will take you to whichever of the 99 locate memories has been selected on the main display. Above and to either side of the Stop button are two smaller locate buttons; the left‑hand one (Set Locate) saves the current tape position into the next available locate memory, whilst the right‑hand one (Copy Tape Location) stores the current tape position into the current locator memory.
The large group of buttons to the left of the transport keys deal with the majority of the machine's configuration and utility functions. They are grouped into two sections, differentiated by a darker background under the first 10 buttons. These 10 buttons include the controls for tape formatting, editing of locator and punch memories, setting the timecode generator and offsets, pre‑ and post‑roll times, individual track delays (up to 185mS at 44.1kHz), and automated punch‑in/out.
The second set of buttons offer automatic tape/input switching, varispeed, and auto‑loop modes. There are also facilities here for metering preferences (peak hold and fall‑back times, as well as a handy line‑up mode), MIDI control and data dumps, and a wealth of Utility functions. This latter is one of the few control areas that involves any cycling around screen menus but, once the Utility functions are set up, they should rarely need to be altered. There are also facilities here to set the output bit resolution (20, 16‑dithered and straight 16‑bit), recording and monitoring modes, timecode functions, and to store or recall the selected user preferences on the tape — a very handy facility indeed.
 A column of buttons to the right of the M20's metering display provide the user with a huge choice of internal routing options. Track arming and monitoring buttons are laid out below the display.
Yet more buttons lurk around the metering display. Below are track arming and input monitoring keys — eight for the digital audio tracks, plus another pair to cover the auxiliary and timecode channels, together with All‑Safe and All‑Input functions. The column of buttons to the right of the metering display are used in conjunction with the metering display to select analogue or digital inputs (in adjacent pairs), the digital source (optical, optional I/O card, or internal track copying), and input routing. This last facility is a useful function which allows Input 1 to feed all the odd‑numbered tracks and Input 2 the even‑numbered tracks, or inputs 1‑4 to double up on to 5‑8, or inputs 1‑8 to feed tracks 1‑8 directly. There are even more elaborate facilities for internal routing of digital signals from the optical or optional digital I/O card to alternative tape tracks, enabling an input to be routed to any other track(s).
The analogue Aux track has a dedicated input on the rear panel, but selected tape tracks can also be recorded to it; an Auto mode copies the currently armed tracks, so that the last overdub is always available on the Aux track as a guide, and for audio scrubbing. The Aux track output is available on a dedicated rear‑panel XLR, but it is also output on whichever channels were used to make the Aux recording. So, if the Aux routing took tracks 1‑4 for the cue track, then the cue signal when jogging or shuttling would be carried by outputs 1‑4 as well as the Aux output.
This is a great idea, and avoids the need for a dedicated channel on the desk just to provide audio scrubbing via the Aux output. Nonetheless, I spent ages (with my brain disengaged) trying to figure out why I couldn't make it work. In the end I realised what was going on: as jogging and shuttling messes up the sampling rate, the aux signal is not available on any of the digital outputs, only the analogue ones — which I wasn't using. Consequently, using the M20 with, say, a Yamaha 01V digital desk connected through the optical interface, requires a supplementary analogue feed to a spare channel or external monitor input just to hear audio scrubbing.
While I'm on the subject, the Aux track is clearly subject to some heavy compression and has a fairly poor signal/noise ratio, but is perfectly acceptable for the purposes of cueing tape and identifying punch‑in/out points. Provided the jog wheel is turned smoothly the audio output is surprisingly smooth, and the output level automatically drops as the speed increases during shuttling, to protect tweeters.
The last two buttons beside the meters select the way peaks are displayed (permanent hold, temporary hold or no peak holds at all), and allow held peaks to be cleared. The metering is very clear, with eight bargraphs scaled down to ‑72dBFS in normal mode, and over +/‑2dB in fine mode (relative to the user reference point). The aux and timecode tracks have low‑resolution meters sufficient to show the presence of signal. Red and white bars under each meter indicate recording and input monitoring, and to their right are a number of hidden‑till‑lit indicators confirming the status and modes of the set‑up buttons alongside.
The Main Display
The central display panel carries messages concerned with setting the machine up and confirming the status of various facilities, as well as showing the current tape time and the selected locator or punch‑in/out times. One of the most useful elements is a row of indicators across the bottom of the display permanently showing the status of the machine — clock source, sampling rate, timecode frame rate and source, varispeed mode and selected locator memory. All of these are vital to the operation of the machine, and cause horrible things to happen if they are not set appropriately.
The two timer displays are large enough to be read from the back of the control room — which is just as well given that the machine is certainly not whisper‑quiet, and you wouldn't want it anywhere near your monitoring position. Although the transport is commendably quiet when spooling, there is a constant whine from the head‑drum, though this might become quieter as the machine beds in, and there is also some fan noise. The M20 was easily as noisy as the average computer, but I imagine that most installations likely to invest in M20s would locate them in a machine room.
 The large main display carries setup information including sample rate and clock mode.
All but three of the 100 locate memories are freely assignable: memory 00 is always the absolute‑zero time on the tape, and memories 98 and 99 are dedicated to the punch‑in/out points. The remaining locate memories should be more than sufficient for any application, and to make searching and recognition of locate points easier these may be given names from an extensive library (which includes options such as Verse, Chorus, Bridge), or altenatively you can create your own tags,
General housekeeping tasks like setting clocking, sample rates, and timecode are quite straightforward on the M20. The clock source functions are selected by pressing the second button under the main display; the first switches the tape counter mode between absolute, relative and timecode times. Clock options include internal, video, remote ADAT, external word clock, optional I/O card, SMPTE timecode, and the digital optical input — a very comprehensive list that should cover every eventuality. If a valid clock signal can't be found on the selected reference, the M20 reverts to the internal clock.
The timecode aspect of the machine is equally impressive, with support for the six standard frame rates (24, 25, and both drop and non‑drop 29.97 and 30) and automatic identification when presented with a video reference or external timecode. The machine also features a built‑in timecode generator which can be jammed to absolute time, existing tape timecode (with offsets if required), or set to start from a user‑defined time. The timecode generator also allows the user to set User Bits to any hexadecimal (0‑9, A‑F) message, perhaps for logging a session ID number, or tape reels. Incoming User Bits on an external timecode, or already recorded on the tape, can also be displayed.
As this is a digital machine, timecode, word clock and video references (if used) must all be synchronous. The excellent handbook makes this very clear, and if you get it wrong, the M20 throws a bit of a tantrum by taking ages to chase, locate, or lock up properly... and who could blame it?
MIDI Facilities
The M20's MIDI implementation supports sending and receiving MIDI Machine Control (MMC), with unique device IDs in multi‑machine configurations, as well as MIDI timecode. One of the most useful facilities, however, is the ability to send and receive MIDI SysEx dumps describing the machine configuration — so locator names and times, track delays, and tape timecode offsets can all be exported or uploaded via MIDI.
As an alternative to using SysEx dumps, you can also save the complete configuration of the machine to the data header at the start of the tape, so that all the appropriate settings can be recalled when a session has to be reworked. Saving data to tape is a surprisingly slow business, but you only need do it at the end of the session, and is a very useful aid if returning to the material at a later date.
Another useful SysEx facility is the ability to export or update the machine's complete operating software. The latest release is always available as a MIDI file on the Alesis web site, and a total update takes only 15 minutes. The machine's software can also be updated by allowing it to talk to another M20.
Joggers And Shuttlers
 provides transport controls, auto‑record and rehearsal modes, autolocate function, and loop facilities.") The LRC (Little Remote Controller) provides transport controls, auto‑record and rehearsal modes, autolocate function, and loop facilities.The final batch of controls, over on the right of the machine, comprise an alphanumeric keypad and the jog/shuttle wheel. The numeric keys allow locator memories to be recalled and timecode values to be set. The keypad adopts the telephone approach of allocating three letters of the alphabet to each number — you need the letters when creating your own locator identifiers, and the system is just as easy to use as scrolling through the alphabet with a data wheel.
The LRC (Little Remote Controller) provides transport controls, auto‑record and rehearsal modes, autolocate function, and loop facilities.The final batch of controls, over on the right of the machine, comprise an alphanumeric keypad and the jog/shuttle wheel. The numeric keys allow locator memories to be recalled and timecode values to be set. The keypad adopts the telephone approach of allocating three letters of the alphabet to each number — you need the letters when creating your own locator identifiers, and the system is just as easy to use as scrolling through the alphabet with a data wheel.
The Jog/Shuttle wheel is very similar to those found on professional video machines and the default mode is that, when turned, the tape transport enters the jog/shuttle operation immediately. Alternatively, the machine can be configured so that the Search button has to be pressed before the wheel becomes active.
The Jog wheel has no momentum, and driving it smoothly is an acquired skill, but I found that perfectly acceptable slow‑speed scrubbing could be achieved quite readily (over a range of 1/8 to 1x play speed). Pressing and releasing the wheel engages Shuttle mode, which spools the tape against the heads over a range from 1/4 to 16x play speed. Again, I found the control to be easy and accurate to use.
Plugging It All Up
The review unit was supplied with a very helpful manual, substantial rack‑mount ears, a blank tape, an LRC little remote controller, a mains cable, an ADAT Sync cable, and a 1m optical lead (just the one!). The LRC panel provides transport functions, some essential autolocate and basic loop facilities, and auto‑record and rehearse modes — enough to allow the majority of multitrack operations to be performed from the comfort of the mixing console.
 The blank panel at the top right of the rear of the M20 can be fitted with the optional eight‑channel AES/EBU card. The auxiliary input and output is available via XLR sockets.
Perhaps the most obvious declaration of professionalism (besides the word 'Professional' written on the bottom of the front panel) is to be found on the rear of the M20 where a wall of XLRs await connection. Eight analogue inputs and outputs are available on balanced +4dBu XLR connectors; the same connectors are used for the Aux and timecode I/Os. A standard multi‑pin ELCO connector provides a parallel analogue I/O option, with Alesis' standard single‑plug analogue interface.
Another row of connectors above the main analogue I/Os provides video reference in/thru BNCs, a 9‑pin D‑sub connector for RS422 remote control, word clock in/out on BNCs, timecode in/out on XLRs, MIDI In/Out, and ADAT digital optical interfaces. There are also two quarter‑inch jack sockets for the small LRC remote controller and footswitch for punch‑ins/outs. A pair of 9‑pin D‑subs allow synchronisation with other ADAT machines, and an RJ45 (telephone) connector links the machine to a remote meter bridge or the CADI remote controller.
The Big Boy's ADAT
The machine is impressive before you lay a finger on it — and as soon as you start to use it, 'impressive' gives way to 'professional'. This is a serious machine for serious users (with serious bank accounts) which is slick to operate, fast and accurate in auto‑location and chase‑synchronising, and sounds absolutely superb. The only thing I can complain about is the annoying fan and head‑drum noise, and I would recommend putting the machine in a remote corner or, better still, a separate machine room.
It is, however, an expensive machine. For the same money you could buy two XT20s, plus a BRC controller, and have enough change for a small library of tapes. Compared with the obvious competition from Tascam it is still expensive, but it should earn its keep in facilities that can justify the initial expenditure because of two important advantages over DTRS format machines — 20‑bits and audio scrubbing.
And for the average ADAT user? The M20 represents a very big step up from the other Type‑II machines, yet there is nothing on it that could be described as frivolous — every feature is well thought out and I could find nothing the M20 could not do, and do well. You won't out‑grow this machine in a very long time!
Pros
- A professional ADAT at last.
- Audio scrubbing in jog and shuttle modes.
- 20‑bit audio path with excellent 24‑bit converters.
Cons
- Relatively expensive.
- Head‑drum and fan noise.
- You'll need the new CADI controller, not the older BRC, to get the most out of the M20.
Summary
A truly professional ADAT machine with every facility anyone could wish for and the ruggedness to survive. Expensive, but well equipped, easy to use, and sounds superb.